Showing posts with label cookbook. Show all posts

For Chris: Our Favorite Tuna Casserole

We make a lot of meals from two cookbooks, Crazy Plates and Eat, Shrink, and Be Merry.  One of our favorite recipes from Crazy Plates is called "Tickle Me Elbows", a WONDERFUL tuna casserole.  I have modified the recipe to suit our tastes.  It is great leftover and is perfect to take to work the next day.

I wish I could include pictures, but they're on our old computer, which Chris has with him.  Anyway, make this tonight...you'll thank me!

Favorite Tuna Casserole (modified from Crazy Plates, a gift from Erin in 2001)

2 cups (dry) elbow or shell wheat pasta (we prefer Barilla whole grain)
1 can water-packed tuna, drained
1 cup finely chopped celery
1/4 diced bell pepper (any color)
1/4 cup diced pimento
1 can condensed cream of celery soup OR 1 can organic cream of celery soup
1/2 cup milk (if using condensed soup, omit if using can of organic soup, as it isn't condensed)
1 cup shredded sharp cheddar cheese, plus more for top of casserole
1/2 cup low fat mayonnaise
1/4 tsp black pepper
Handful of whole wheat breadcrumbs (plain or seasoned)

Preheat oven to 350.

Cook macaroni according to package directions.  Drain.  Rinse with cold water and drain again.  In large bowl, combine cooked macaroni, drained tuna, celery, bell pepper, and pimento.  Toss to mix.

Organic Cream of Celery Soup
www.healthvalley.com

Combine soup and milk (if using condensed soup!) in a small saucepan.  Heat soup over medium heat until smooth and warm.  Add shredded cheese and continue to cook until cheese is melted.  If you're feeling crazy, toss in a little extra cheese!  Remove from heat, stir in mayonnaise and black pepper.

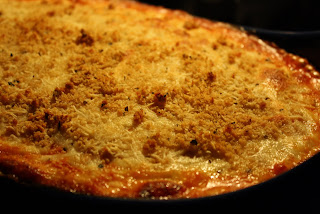
Pour sauce over noodle mixture.  Mix well.  Pour into a 1 1/2 quart casserole dish that has been sprayed with non-stick spray.  Sprinkle with shredded cheddar and breadcrumbs.  Bake uncovered for 30 minutes.

My current favorite, www.iansnaturalfoods.com.

What is your favorite tuna recipe?
Tofu Parmesan

This one's for you, Ranger Amy!  Tofu parmesan has quickly become a favorite in our little household.  I found it in the fabulous Eat, Shrink, and Be Merry cookbook.  Don't walk, run, to buy this book!  While you're at it, you should also buy Crazy Plates, too.  Both cookbooks were gifts from Erin and I have used them every week since receiving them.  You won't miss calories or fat one bit! I've made some modifications to the Tofu Parmesan to suit our tastes. Even meat eaters are sure to love it.  It's really easy and makes pretty good left overs.

Tofu Parmesan

Olive Oil Cooking Spray
 1 lb. extra firm tofu
1 cup whole wheat bread crumbs
1/4 c. + 2 tbs. freshly grated parmesan
1/2 tsp. each dried basil and dried oregano
1/4 tsp. each kosher salt and ground black pepper
1 egg
1 jar of your favorite sauce (or homemade sauce if you're feeling fancy)
1/2 c. freshly shredded mozzarella (ok, let's be honest, we don't measure the mozzarella)

Preheat oven to 400 degrees.  Spray a baking sheet with olive oil spray and set aside.

Remove the tofu from the water and pat dry with paper towels. Cut the tofu into 8 equal slices.  Lay the slices out on paper towels to drain.

To prepare the breading, mix the breadcrumbs, seasoning, and 1/4 c. parmesan in a bowl or breading tray.


Break the egg into a bowl or tray.


To bread the tofu, pat it dry one last time and dip each slice first in the egg and then breadcrumb mixture.  Make sure both sides are completely coated.  Place breaded tofu slices on prepared baking sheet.  Spray the tops of the slices with the olive oil spray.  Bake for 8 minutes on each side (yes, that means 16 minutes total).  Remove from oven and leave oven on.

Prepare a casserole or deep baking pan by spraying it with olive oil spray and spreading a layer of sauce on the bottom.  We use our small, oval Rachel Ray pan (THANK YOU AMY!!).


Layer the slices of tofu on top of the sauce.  We usually have two layers of tofu slices.  Top with remaining pasta sauce, mozzarella, and parmesan.  Don't be shy with the cheese!  I also sprinkle some of my leftover breading crumbs on top.

Bake for about 15 minutes.  To brown the cheese, then turn the broiler on and broil for about 2-3 minutes until golden brown.  Let stand 5 minutes before serving.

We like to have our tofu parmesan with pasta.  I'd suggest preparing the pasta water while the tofu is baking.  We typically enjoy this dish with Barilla Whole Grain Angel Hair pasta.  Although, we recently had it with regular spaghetti.  Either way, it is just perfection!


Thank you Amy and Mark!

We received a Christmas package from Amy and Mark last week.  It was filled with goodies from Crate & Barrel.  They must know how much we like to make homemade pizza!  We can't wait to use the personal pizza pans and make the flatbread crust.  It only took me 5 minutes to figure out how the tomato/mozzarella cutter works, so we'll be good to go! Actually, Chris had to take it and show me how it works.  I would've been here all night. The pizza cookbook is wonderful, too!

Check it out...


THANK YOU, AMY AND MARK!!!!

Old Salt

When I returned from California, my generous friend, co-worker, and Teacher-Ranger-Teacher, Amy, gave me a wonderful new cookbook called Cooking Yourself Thin. Amy has been working with me at the park for almost two months. She has heard all about how Chris and I have been doing weight watchers for almost two months and have really tried to improve what we're eating at home. After some adjustments, we have found that it's really not that hard to still have good food...it's all about moderation! I was SO excited to try out my new cookbook.

Amy dropped a hint that she really wanted to try the peanut butter chocolate bars in the new cookbook. So, I went to work in the kitchen. As each layer was added, even I got excited (I usually think peanut butter only belongs on bread!). Each layer had to be refridgerated and the recipe took a bit of patience. But, I was rewarded with a tasty-looking treat...


I eagerly shared a square with Chris, who was practically drooling at the sight of my creation. Then, he took a bite, made a face, and pinched his lips. They were WAY too salty! I promptly deconstructed the bars and determined the source of the excessive salt was the peanut butter/cream cheese layer right in the middle. It called for salt, I added the salt, end of story. I don't recommend it! Sadly, I threw them out before I could share them with Amy, who has certainly earned herself a sweet treat.

BUT....I made them again this week without the salt. Chris and Amy liked them. I love me a pb sandwich, but put that with chocolate and I'm not interested, so I shared all of them. Here's to you, pb lovers Amy and Chris!

Here is the recipe from the book, sans salt:

Peanut Butter Dream Bars
Serves 8

1/2 cup low calorie thin chocolate wafers, finely ground in a food processor (I used 100 calorie packs of oreos)

1/2 cup oats

1/3 cup confectioners' sugar

3 tbs. unsalted butter, melted and cooled

1/4 cup creamy peanut butter (I suggest using Skippy Natural)

1 1/2 oz. reduced-fat cream cheese, room temperature

2 teas. pure vanilla extract

2 tbs. semi-sweet chocolate chips, melted


1. Line a loaf pan with parchment, leaving an overhang on the sides


2. Combine the ground wafers, oats, and sugar in a medium bowl. Stir in the butter until everything is evenly moistened. Stir in 1 tbs. of the peanut butter. Mixture will form large clumps. Transfer to lined loaf pan, press into an even layer. Refrigerate until firm, about 10 minutes.


3. Beat cream cheese with electric mixer on medium speed until smooth and fluffy, about 2 min. Add vanilla, remaining 3 tbs. of peanut butter, and beat on medium speed until pale and nearly doubled in volume, about 7 min. Transfer to loaf pan, spread in even layer over crust. Freeze until firm, at least 10 min.


4. Spread melted chocolate in a thin, even layer over the chilled peanut butter layer. Refrigerate until firm, about 10 min.


You can lift the bars out of the pan using the parchment overhang. Cut and serve cold. Enjoy!